ESP-IDF C++ Components Library
Modify our libraries for import into larger projects as components
Up to now, we have been creating several useful libraries. However, we’ve been packaging them as projects, limiting their reusability.
In this tutorial, I’m going to show you have to repackage the libraries into components that can then be used in any project.
I’m going to do this tutorial before I do the SPI and I2C tutorials because I want to create SPI and I2C libraries as components in a larger project to demonstrate portability.
Create a GPIO component
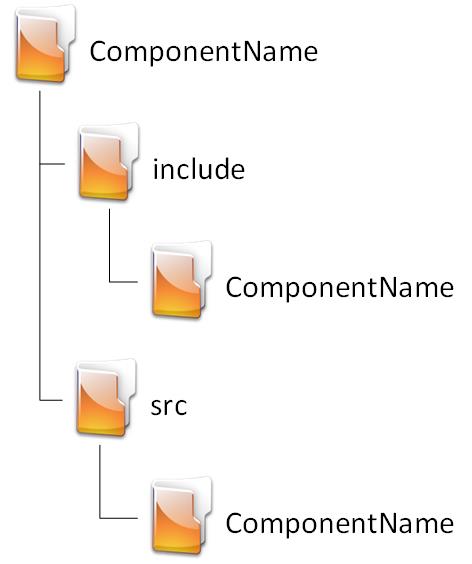
Component folder structure
Components will typically have only 2 folders:
- include: this will hold the header files for the component
- src: This will hold all the source files
Some components can have more folders.
Open the CPPGPIO project
For this tutorial, we are going to convert the CPPGIO project created in part 1, part 2, and part 3 into a component.
If you have not done the tutorial, you can download the CPPGPIO library from GitHub here.
Remove extra files and folders
In VS Code, open the CPPGPIO folder and delete everything except CMakeLists.txt, src, and include.
Navigate into the src folder and delete main.h, main.cpp, and CMakeLists.txt
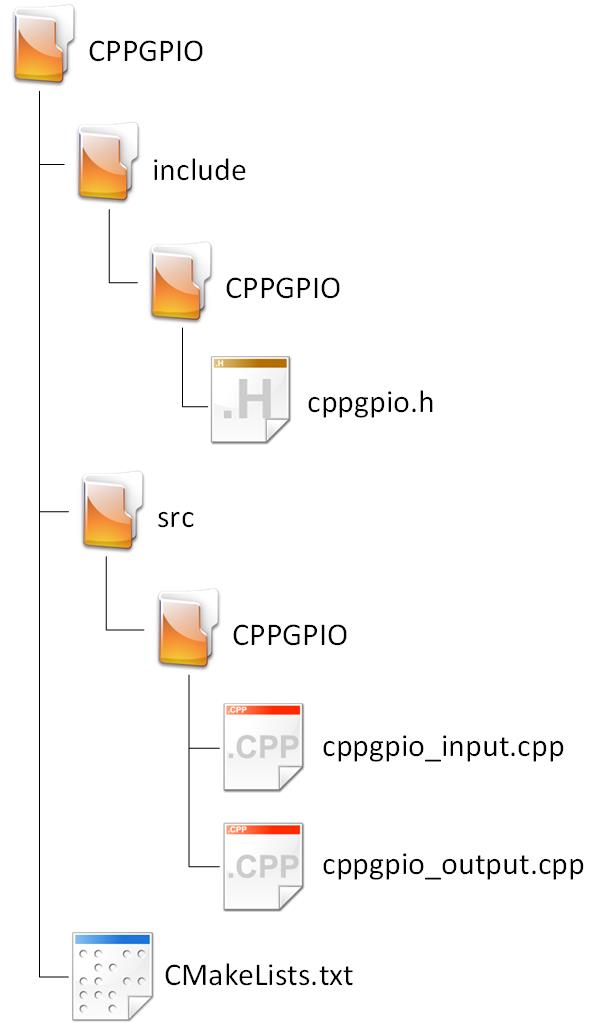
Modify CMakeLists.txt
Open CMakeLists.txt in the root of the CPPGPIO folder and replace the content with the following:
set(SOURCES src/CPPGPIO/cppgpio_input.cpp
            src/CPPGPIO/cppgpio_output.cpp)

idf_component_register(SRCS ${SOURCES}
                    INCLUDE_DIRS include)
Note that some components are dependent on other components, in those cases, we need to add the REQUIRES keyword underneath INCLUDE_DIRS and then list the components. An example would be a BME280 driver component being dependent on an I2C or SPI component.
Update the include paths
We just updated the CMakeLists.txt file to look for the header files in the include directories. However, we placed the headers in another folder in the include folder. We need to update the source files so they will know where to find the header files.
Open cppgpio_output.cpp and change
#include "cppgpio.h"to
#include "CPPGPIO/cppgpio.h"Now do the same for cppgpio_input.cpp
That’s it, you will now be able to copy this CPPGPIO folder into the components folder of any project and be able to use the GPIO classes.
Use CPPGPIO as a component in a project
Create a new project
Create a new sample project. For a full tutorial on how to create a new project please click here.
The short point-based version of how to create a project is:
- Click on View then Command Palette
- Select/type ESP-IDF: Show Example Projects
- Select sample_project from the left and click on Create project using sample_project
- Create a components folder
- Rename main.c to main.cpp
- Update CMakeLists.txt
Name the project anything, however, remember not to add a space into the name. For this tutorial, I’m going to leave the project name and folder as is.
Open CMakelists.txt in the root project folder and change the content to the following:
# For more information about build system see
# https://docs.espressif.com/projects/esp-idf/en/latest/api-guides/build-system.html
# The following five lines of boilerplate have to be in your project's
# CMakeLists in this exact order for cmake to work correctly
cmake_minimum_required(VERSION 3.8)
set(CMAKE_CXX_STANDARD 17)
set(EXTRA_COMPONENT_DIRS components)
include($ENV{IDF_PATH}/tools/cmake/project.cmake)
project(main)
The important line here is set(EXTRA_COMPONENT_DIRS components). This tells CMake to look for additional components in the components folder.
CMakeLists.txt should have updated main.c to main.cpp when you changed the file name. If it did not then you need to change main.c to main.cpp in CMakeLists.txt now.
Add the CPPGPIO component to the project
Copy the CPPGPIO folder into the components folder of the new project that we just created.
You should ow be able to include the header in main.cpp and use the GPIO classes. Let’s try.
Open main.cpp and add the following code:
#include <stdio.h>
#include "CPPGPIO/cppgpio.h"

CPPGPIO::GpioOutput led {GPIO_NUM_2};

extern "C" void app_main(void)
{
    led.on();
    vTaskDelay(pdTICKS_TO_MS(1000));
    led.off();
    vTaskDelay(pdTICKS_TO_MS(1000));
}
I chose GPIO_NUM_2 because that is where the onboard LED is located on my NodeMCU32.
The application will now use the CPPGPIO library as a component to turn the LED on and off.
You can use the same method to convert all of the libraries that we made thus far into components to use in other projects.
You can download my component libraries from GitHub here.
Thanks for reading.