ESP-IDF C++ with CMake for ESP32
Write programs for the ESP32 using ESP-EDF C++ like a pro
Configure the ESP-IDF VSCode environment to develop in true C++ Standard 17
A lot of people first getting into this wonderful space of embedded system design do so through Arduino which uses C++ with many built-in functions. In this guide, you will learn how to modify the CMakeLists.txt files to set up the environment for ESP-IDF VS Code C++. CMakeLists.txt is used by CMake to configure the build system used by the ESP-IDF. For more information on CMake, you can visit their website at cmake.org.
While C is a wonderful language to use, I prefer C++ for the OO (Object Oriented) model that it employs. Most of my future tutorials and guides for the ESP-IDF will be done using C++.
14 June 2022: Updated to change the project name and folder structure.
What you will need
Some of the following links might be affiliate links to amazon. As an Amazon Associate, I earn from qualifying purchases.
- The ESP-IDF setup in VS Code. Click here for instructions.
- A development board
- I use the NodeMCU32 for the tutorials.
- Buy NodeMCU32s from Amazon
- A Breadboard
- Buy from Amazon
- Breadboard Jumper Wires
- Buy from Amazon
Create a new sample Project
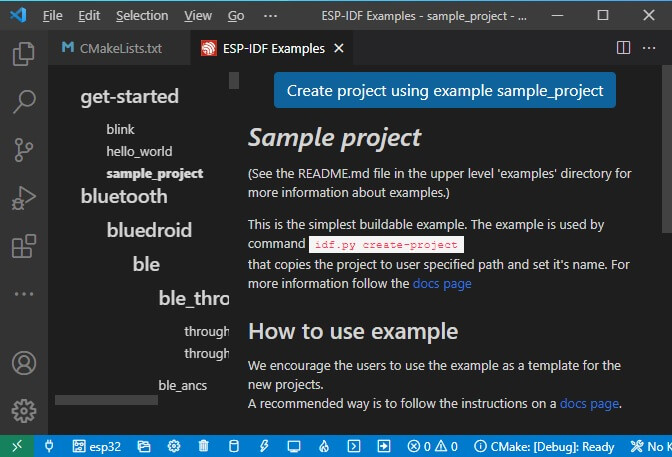
Open VS Code and press Ctrl+Shift+P to open the command palette. Begin to type ESP-IDF: Show Example Projects. When available, click on ESP-IDF: Show Example Projects and then click on Use current ESP-IDF. This will bring up the list of available example projects.


Give the project a name
By creating a project from a template all of the settings in the .vscode folder are properly created saving us a lot of headaches. The downside is that the project folder and project name are set to sample_project which is not ideal.
To change the project name, navigate to the project folder using windows explorer and manually change the folder name to whatever you want to name the project. You need to close the project folder in VS code before you will be able to change the folder name. To close the folder click on File and then click on Close Folder. I’m going to name this project HelloCMake.
Now you can open the newly renamed folder in VS Code by clicking on File and then on Open Folder. At this point you might encounter a message to select or create a build environment depending on which plugins you have installed, do not select any of the options.
The next thing to do is to clean and build the project. It is important to do a full clean before you build the project. If the project builds successfully then you know that everything worked correctly. If there is no build directory then you receive a message informing you that there is no build directory to clean.
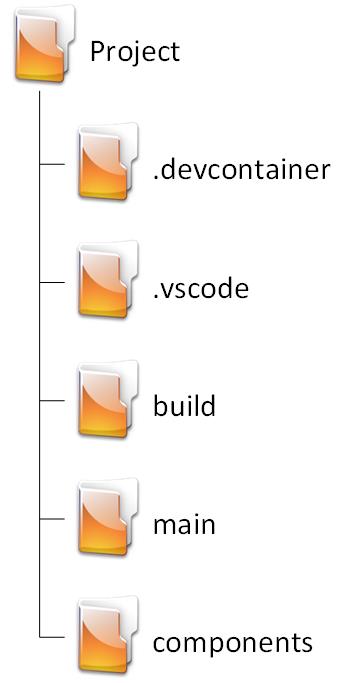
The folder structure
You should now have a folder structure that looks like the image to the left. If you have not built the project yet then the build folder will be absent.
A quick summary of the folders
- .devcontainer This folder is hidden in a Linux environment and should not be edited. It contains settings if you want to run the project and build-environment in a docker container. This is useful if other installations interfere with your ESP-IDF environment.
- .vscode This folder is also hidden in a Linux environment. This folder contains the configuration and task settings for your build process. Changing these settings can cause the build to fail.
- build All the files needed during the build process are generated in this folder.
- main This folder is treated specially by the ESP-IDF when in the correct position. All other components are automatically added as dependencies saving us from having to add all of the dependencies manually.
- components This is where we are going to add the libraries that we will create over the next few tutorials.
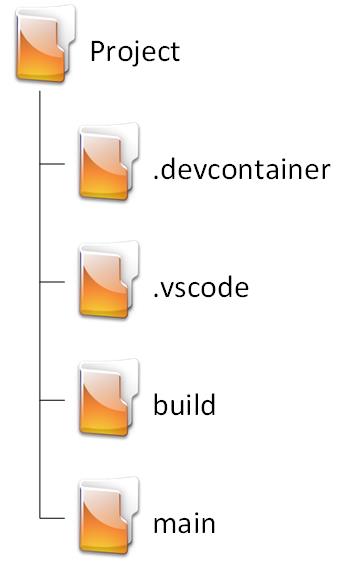
For this tutorial, you do not need to add the components directory to the folder structure because we are not going to use any custom components.
Rename main.c to main.cpp in the folder named main.
The project should now fail to compile because it’s not configured for C++ yet. We will fix that in the next section.
Configure CMake for C++
Open CMakeLists.txt located in the root directory and change the contents to the following:
cmake_minimum_required(VERSION 3.8)
set(CMAKE_CXX_STANDARD 17)
set(EXTRA_COMPONENT_DIRS components)
include($ENV{IDF_PATH}/tools/cmake/project.cmake)
project(HelloCMake)
This will be boilerplate code that can be copied and pasted into nearly all new projects.
Let’s look into what each line is for:
cmake_minimum_required(VERSION 3.8)The minimum version of CMake that supports C++ 17 is version 3.8. If you have an earlier version installed then this will output an error.
set(CMAKE_CXX_STANDARD 17)Here we tell CMake that we will use the C++ 17 standard to compile our code.
set(EXTRA_COMPONENT_DIRS components)Here we tell CMake where to look for extra components that our project might use.
CMake will look in all of the directories specified for additional CMakeList.txt files which will provide more information about what files to compile.
include($ENV{IDF_PATH}/tools/cmake/project.cmake)This line of code specifies where CMake will be loaded and run from.
project(HelloCMake)Set the name of the project.
Write a program in ESP-IDF C++
Normally we do not need to create a header file for the main application. However, for illustration purposes, we will create a header file named main.h in the main folder.
Open main.h and add the following code:
#pragma once

#include <iostream>
#include "freertos/FreeRTOS.h"
#include "freertos/task.h"

class HelloCMake final
{
    public: void run(int i);
};
Some people do not like to use the #pragma once as include guards, I find it to be much cleaner than the alternative, and GCC used as the ESP-IDF compiler support it just fine. For now, we are only going to declare a simple class to demonstrate that we are indeed using C++.
Open CMakeLists.txt in the main directory and change the contents to the following:
set(SOURCES main.cpp)
idf_component_register(SRCS ${SOURCES}
                    INCLUDE_DIRS . ../include)
Let’s look into what each line is for:
set(SOURCES main.cpp)Here we are creating a variable named SOURCES which contains normal text main.cpp. In this example it’s not necessary since it’s only one file, however, for large projects with many source files, this makes the CmakeLists.txt file cleaner and more maintainable.
idf_component_register(SRCS ${SOURCES}This tells the Cmake system that main.cpp is located in this directory and needs to be compiled.
INCLUDE_DIRS . )This is part of the previous command. This tells the CMake system where to look for the header files. The single period tells CMake to look for header files in the same directory where CMakeLists.txt is located.
Open main.cpp and add the following code:
#include <iostream>
#include "freertos/FreeRTOS.h"
#include "freertos/task.h"

#include "main.h"

void HelloCMake::run(int i)
{
    std::cout << "Hello World from C++ "<< i << '\n';
    vTaskDelay(pdMS_TO_TICKS(1000));
}

extern "C" void app_main(void)
{
    HelloCMake App;
    int i = 0;

    while (true)
    {
        App.run(i);
        i++;
    }
}
This code will have the output of a string: “Hello World from C++” followed by an incrementing counter.

In the next tutorial, we are going to create a GPIO class to handle basic input and outputs. We will in part 2 and part 3 expand on this class to add interrupts and event-driven inputs.
Many future projects will build on the foundation established in this tutorial.
Thank you for reading.